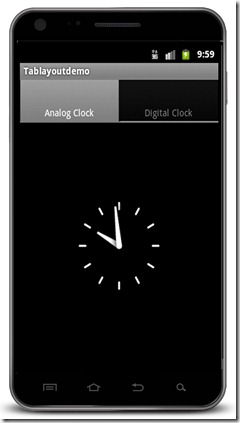
Today we are going to learn how to implement Android Tab layout in the Android Application development.So here am adding two tabs which contains a Analog Clock and a Digital Clock.Lets learn it.
STEP BY STEP
1.Create an Android Project
2.Now we need to add Tab host and Tab Widget from Composite Components
Then the main.xml is shown bellow
<?xml version=”1.0″ encoding=”utf-8″?>
<LinearLayout
xmlns:android=”http://schemas.android.com/apk/res/android”
android:orientation=”vertical”
android:layout_width=”fill_parent”
android:layout_height=”fill_parent”>
<LinearLayout
xmlns:android=”http://schemas.android.com/apk/res/android”
android:orientation=”vertical”
android:layout_width=”fill_parent”
android:layout_height=”fill_parent”>
<TabHost
android:id=”@+id/tabhost”
android:layout_width=”fill_parent”
android:layout_height=”fill_parent”>
android:id=”@+id/tabhost”
android:layout_width=”fill_parent”
android:layout_height=”fill_parent”>
<TabWidget
android:id=”@android:id/tabs”
android:layout_width=”fill_parent”
android:layout_height=”wrap_content”/>
android:id=”@android:id/tabs”
android:layout_width=”fill_parent”
android:layout_height=”wrap_content”/>
<FrameLayout
android:id=”@android:id/tabcontent”
android:layout_width=”fill_parent”
android:layout_height=”fill_parent”
android:paddingTop=”62px”>
android:id=”@android:id/tabcontent”
android:layout_width=”fill_parent”
android:layout_height=”fill_parent”
android:paddingTop=”62px”>
<AnalogClock
android:id=”@+id/tab1″
android:layout_width=”fill_parent”
android:layout_height=”fill_parent”
android:layout_centerHorizontal=”true”/>
android:id=”@+id/tab1″
android:layout_width=”fill_parent”
android:layout_height=”fill_parent”
android:layout_centerHorizontal=”true”/>
<DigitalClock
android:id=”@+id/digitalClock1″
android:layout_width=”wrap_content”
android:layout_height=”wrap_content”
android:text=”DigitalClock”
android:layout_gravity=”center”/>
android:id=”@+id/digitalClock1″
android:layout_width=”wrap_content”
android:layout_height=”wrap_content”
android:text=”DigitalClock”
android:layout_gravity=”center”/>
</FrameLayout>
</TabHost>
</LinearLayout>
</TabHost>
</LinearLayout>
3.Now we need to add the activity class
The TablayoutActivity.java is shown bellow.
package com.androidituts.tab;
import android.app.Activity;
import android.os.Bundle;
import android.widget.TabHost;
import android.os.Bundle;
import android.widget.TabHost;
public class TablayoutdemoActivity extends Activity
{
/** Called when the activity is first created. */
@Override
public void onCreate(Bundle savedInstanceState)
{
super.onCreate(savedInstanceState);
setContentView(R.layout.main);
{
/** Called when the activity is first created. */
@Override
public void onCreate(Bundle savedInstanceState)
{
super.onCreate(savedInstanceState);
setContentView(R.layout.main);
TabHost tabs=(TabHost)findViewById(R.id.tabhost);
tabs.setup();
TabHost.TabSpec spec=tabs.newTabSpec(“tag1″);
spec.setContent(R.id.tab1);
spec.setIndicator(“Analog Clock”);
tabs.addTab(spec);
spec=tabs.newTabSpec(“tag2″);
spec.setContent(R.id.digitalClock1);
spec.setIndicator(“Digital Clock”);
tabs.addTab(spec);
tabs.setCurrentTab(0);
}
tabs.setup();
TabHost.TabSpec spec=tabs.newTabSpec(“tag1″);
spec.setContent(R.id.tab1);
spec.setIndicator(“Analog Clock”);
tabs.addTab(spec);
spec=tabs.newTabSpec(“tag2″);
spec.setContent(R.id.digitalClock1);
spec.setIndicator(“Digital Clock”);
tabs.addTab(spec);
tabs.setCurrentTab(0);
}
}
4.Then run the android project.
5.Output is shown bellow.


Post a Comment